Developing the illustration for the iPhone “skin” did not start as a completely preconceived idea. In this case, I began with the camera. I felt in needed to be fully integrated regardless of my uncertainty of the final concept. I did not like the idea of it “floating” in my illustration. And by doing so the rest of the concept was revealed. Sometimes it is good just to jump in even with just a partial concept, because as I get busy, the creative process will certainly be stimulated, and ideas begin to evolve
Step 1
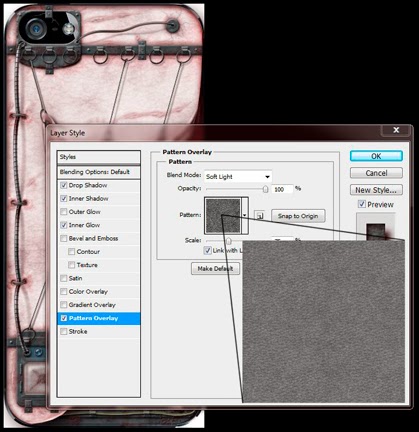
I first used the rounded rectangle tool to pull out a basic square around the camera, and then reshaped it a bit so as not to be so square. I decided I liked the idea of metal; but because the iPhone has such a high gloss aesthetic, I thought a worn metal would make a nice contrast.I filled the shape with a bluish gray color to create the basic plate. Then I made a selection of the camera and deleted that space from the fill, to allow the layer style to be apparent on all edges. Next I added an inner bevel with a chisel hard edge, and a pattern overlay with a mottled pattern to age it some. Painting on a layer mask let me chip away at the edges for an even less refined appearance. Now that the camera was encased it still seemed detached, so I created the binding clips and cross bar (using the same layer style) and a simple small brush with a basic bevel for the rivets. For a little more detail and interest, I then created the rings. This is just a path created with the ellipse tool that I then stroked with a hard edged small brush using the same color as the metal plate. I added the same layer style with the exception of the bevel, changing the contour to “Ring” (hmm, seems appropriate now), and a drop shadow.

Step 2
The ring clips were created the same way as the others,
but adding a second layer for the ring housing to pass through with a
simple rectangle and a gradient overlay (black to gray to black) to
create dimension. Once one ring and clip were complete, I grouped those
layers and then duplicated the group several times and moved them into
place. It was at this point the creative synapses really started firing,
as I thought something needed to be attached to the rings and the whole
metal camera casing needed to be embedded into something. Aha - It’s
Flesh! But I wanted it be a little horrifically experimental and
fetishy.So here I filled the base shape with a grayish pink to give an unhealthy hue. With this skin theme established, I needed to go back to my metal camera contraption, and added outer glows with various pinks and reds with some noise to imply some inflammation and infection. I therefore changed the shadows to a deep dark red with lowered opacity and bright white highlights of the metal to a dingy pink to give some sense of radiosity.
Next I turned my focus to the general skin aspect. After filling the skin layer with my chosen base color and added a Pattern Overlay (basically Render>Clouds, scaled up and set to Overlay in the blending mode) to continue that unhealthy look, I used Transform>Warp and pulled the lower right corner up toward the left corner. But before doing this, I created a blank layer below and merged down, which would preserve the mottled pattern so that when I warped the layer, it would actually stretch that pattern for a better sense of realism. Though I would not use this warp specifically, it provided a template for me to create the pulled skin flap Now I could use the pen tool to trace the basic shape of the skin flap that I could then duplicate to its own layer to keep that stretched appearance, adding the pulled points where it would attach to the rings.

Step 3
Creating a new layer, I filled the new path with a darker pink for the underside of the skin. Now for the details. I added a mottled pattern overlay set to a soft light blending mode and reduced opacity to give an uneven blood distribution effect. On a new layer, I made a loose random selection with the lasso tool and ran an old Alien Skin plugin filter (Xenofex 2>Electrify) to generate random branched “veins.” From here, I individually selected specific veins and placed each on its own new layer, moved each into place on the skin flap and transformed it to fit. Next I added a layer style, namely a soft bevel and light drop shadow. To further enhance the effect, I dropped the fill on each one, preserving the layer style but reducing its opacity, giving it a translucent look. Adding a layer mask, I cleaned up where the veins met the edges of the skin, but also used a soft edged brush with a reduced opacity of black to lightly fade the ends of the veins to appear like they were fading into the skin. To create the folded over aspects of the skin flap, I used the lasso tool to make quick loose selections (subtracting an inverse selection of the original skin flap to keep the edges aligned), and on new layers filled those areas with the exterior skin color, adding a layer style of a soft bevel and drop shadow. To give some more dimension, particularly the pulling effect, I essentially used a dodge and burn effect, but rather than using those tools on the skin layer directly, I added a new layer above it, changed the blending mode to soft light (I find this tends to work better for skin than overlay), and painted with black & white with a soft edged brush with low opacity and pen pressure override set for both size and transfer. This allows me to build up the effect as needed.
Here I turned back to the exterior skin. I wanted to carry the biomechanical aspects further, and so created the plate in the lower left corner using the same layer styles as the camera housing. So as not to recreate the exact same thing, however, I included what amounts to something like a “bio-port” that would be protected by a glass cover. I created the “bio-port” scar with a small brush using a dark pink color (again with pressure sensitivity overrides set), a layer style of bevel & emboss and inner shadow, and using small stippled strokes built up the wound until I reached the desired look. The glass cover is a simple square filled with light gray with a bevel & emboss, inner shadow, and drop shadow layer style, and then reducing the layer fill to around 10%. I added an additional highlight by painting a right angle with white, running a slight Gaussian blur and dropping the opacity.
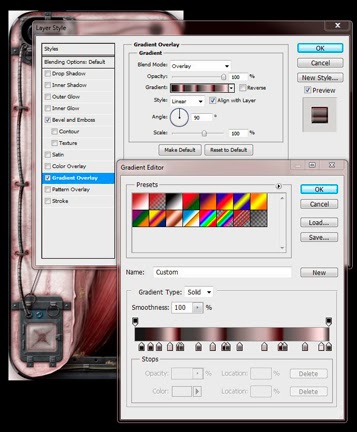
For some continuity, and to keep the eye moving around the illustration, I added the cord between the two metal encasements. Because straight is boring, I created a bent line path with the pen tool. I also figured I could add some more horrific detail by attaching it to the flesh as well. I simply stroked this line with a hard edged brush with a dark gray. Again I used the bevel and emboss with the “Ring” contour that I had employed for the small rings, adjusting the settings as needed for the thicker line. I needed the cord to look like it was wavering over the skin, and thus needed some additional shadows and highlights, but rather than using the dodge and burn effect I described above (which would have worked) I decided I would use the gradient overlay in the layer style where I could add blacks, whites, and grays in the appropriate areas to give that dimensionality I was after. This was better too because it also let me add some red, suggesting some old blood and a little radiosity again. I could have painted this as well, but it’s nice to have a layer style I can quickly go back in and adjust if needed without creating new layers and repainting.
Step 4
I created the segmented look by adding a new layer above the current layer with the cord, using a small hard edged brush with the same dark gray and a tight bevel & emboss and drop shadow, and made quick horizontal strokes up the length of the cord. To keep from getting outside the bounds of the cord, I made a selection of the cord first (Ctrl clicking the layer thumbnail of the cord). Next I painted 3 simple arcs for the stitches pinning the cord to the skin, using the same layer style as the rings.So the cord needed a shadow too, but one that made sense, because a simple drop shadow was not going to work here. To achieve this, I stroked the same path again with black on a new layer, moved that layer beneath the cord layer, and flipped it horizontally, and then distorted it so the pinned-down points were aligned. I ran a Gaussian blur and reduced the opacity of the layer. But that still was not enough, because shadows change density based on their proximity to the object casting it. So once again I added a layer mask, and using a soft edged brush with reduced opacity black, and pressure sensitivity constraints set, painted away the areas where the cord appeared to lift furthest from the skin, softening that shadow. I used this same technique on the wire at the top of the illustration.
I focused next on attaching the skin flap to the rings. This was rather quick and easy. I duplicated one of the rings from the metal plate, and simply transformed each one by rotating and scaling each where I aligned it to the holes in the skin. A quick mask and they appeared to pass right through. As for the rings on the crossbars, again I applied a Transform (scale and distort) to create the look of pulling and tension. I followed that with some straight lines (necessary here) and adjusted the bevel and drop shadow accordingly.
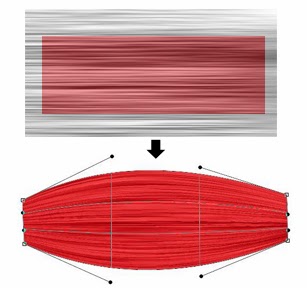
Now I could move deeper into the interior. I wavered between viscera and muscle, ultimately going with muscles as it was the correct next layer anatomically (as well as having a good idea to create them). Here I added a new layer, created a rectangle with the Rectangle Marquee tool and filled it with a deep red. Now I needed some striations, so I created a larger rectangle with the Marquee tool again on new layer above the layer containing the red rectangle, and filled it with 50% gray. I set my foreground and background colors to default black and white and then ran the Render>Fibers filter (not a lot of variation but fairly high strength), followed by a motion blur in the same direction as the fibers to smooth them out a bit. I changed the layer blend mode to Soft Light. Making sure the fibers are running longitudinally correct with the length of the muscle, I next scaled the fibers layer to compress the fibers into a tighter space, but making sure to keep it larger than the red rectangle. I made a selection of the red rectangle, and still on the fibers layer, duplicated the layer (Ctrl+J) using that selection; then combined this new fibers layer with the red rectangle layer into one layer. Now I used Transform>Warp and pulled the ends in and middle out to create the fusiform shape of the muscle.
Step 5
To create dimension, I added a layer style using a gradient overlay and inner shadow. I moved this new muscle below the skin flap layer and rotated it into place. I duplicated the muscle layer, moved it below the first muscle and transformed its position a little. I added a drop shadow to the first muscle to create some depth. I duplicated the muscle layer 2 more times and moved the below the previous one and rotated them into place, further creating depth.
Keeping with the flow and continuity of the image, I again created the 2 bio-cords beneath the skin similar to the one on the exterior. To keep in interesting, I thought an intravenous injection would be a nice addition. The cords were created the same way as described above, and using the Pen tool created the line that would be the thin blue wire wrapped around the cord. I stroked the path with a bright blue and added another layer style similar to the cords, and then added a layer mask to remove the areas that incorrectly crossed over the cord, to make it look like it was snaking around it. I made the needle heads more polished looking to suggest some sterility, as well as present some contrast to the more worn aspects of the exterior. And to create the sub-fascia insertions, I simply made a selection of the needle, expanded the selection by a few pixels, feathered that selection by a couple of pixels and, going back to the muscle layer, duplicated that selection of the muscle to its own layer, followed the addition of a soft bevel and drop shadow. I added a layer mask and pulled a black to white gradient up the direction of the needle to soften the tip. Next I used a small soft edged brush with my foreground color set to white, lowered the opacity to around 15%, and using the sensitivity constraints, made quick light strokes to create the connective tissue seen attaching the skin flap to the muscle and at the needle insertion sites.
Getting close to the end, but still unfinished, I felt I needed some internal structure as a frame for the phone and to which the skin may have been attached. Using the same techniques as the exterior metal pieces I created the scaffolding at the edges. Sticking with the idea of keeping the eye continuously flowing around the illustration, I created the fluid-filled vessel and piping. It also seemed to add a little mystery. And for just a little more nuanced detail, I added the little piece of flesh bound to the framework by a small rivet, implying previous
For final touches, I just needed some integral scattered details. First , I added the adipose by creating a couple of layers, painting on each one with a small, low opacity spatter brush with a light yellow, and added a layer style of bevel & emboss with a texture to provide a slightly lumpy appearance and a drop shadow. I painted with small erratic strokes, building up the look. I added the same adipose in crevices of the metal and wires to help them feel more grounded in the composition. I used a similar effect for the blood, using the spatter brush, in some cases painting in strokes for a smeared look and quick clicks (with the mouse no less – the one time I deviated from my Wacom tablet) for a more precise droplet effect. Still using the spatter brush (set to a larger diameter and low opacity) I softly painted bruised and irritated areas on the skin exterior. Adding scars help suggest the horrific experimental aspect. They are a series of irregular painted strokes using a light pink sampled from the base skin color; a layer effect with soft bevel and emboss and a low opacity outer glow of red with some noise, again to achieve a look of inflammation. And yet the exterior skin seemed a little too smooth and “flat.” What I realized I needed was a subtle skin texture, using a combination of Filters, defining it as a pattern, and using it as a Pattern Overlay set to Soft Light blending mode.